Accept Apple Pay
Apple Pay works on Apple devices only:
| iOS devices | macOS devices |
|---|---|
| Safari on an iPhone or iPad with Apple Pay set up | Safari on a Mac with Touch ID, or on a Mac from 2012 or later paired with an iPhone or Apple Watch that has Apple Pay set up and Handoff turned on |
You can offer it in two ways:
- On PayMe's Hosted Payment Page. Nothing to build: enable the service, then create a sale with
sale_payment_method: "apple-pay"ormulti. - On your own page, with the browser SDK's
appleSale(). You host PayMe's domain file, register your domains, and show the Apple Pay button yourself. The steps are below.
Installments aren't available with Apple Pay: a sale with sale_payment_method: "apple-pay" and more than one installment fails with error 351. On a multi page that lets the buyer choose the number of installments, a buyer who pays with Apple Pay pays in a single payment.
Enable Apple Pay
A seller installs Apple Pay from the dashboard app store (חנות אפליקציות), and it is active as soon as it is installed. A partner enables it for its seller with vas-enable. Without the service, generate-sale with apple-pay fails with error 720.
On PayMe's Hosted Payment Page
You don't need an Apple developer account or a domain file: PayMe's Apple merchant ID is used. The button appears only in Safari on an Apple device with a card in Wallet, so a test from Chrome or Windows shows no Apple Pay.
Recurring payments with Apple Pay need a merchant token, which only the Hosted Payment Page requests, and PayMe-side configuration of the account. See Recurring Payments.
On your own page
- Host PayMe's domain file on every domain that shows the button.
- Register the domains with
vas-enable. - Get the testing account.
- Create the sale on your server.
- Show the Apple Pay button with the browser SDK.
- Test your integration.
appleSale() doesn't request merchant tokens, so it pays one-time sales only. For recurring Apple Pay, use the Hosted Payment Page.
Registering domains with vas-enable takes a partner key. If you are a seller without a partner, contact PayMe Partners (partners@payme.io) to register your domains.
Step 1: Host PayMe's domain file
Download PayMe's file from the environment where you call vas-enable:
| Environment | Download from |
|---|---|
| Sandbox | https://sandbox.payme.io/.well-known/apple-developer-merchantid-domain-association |
| Production | https://live.payme.io/.well-known/apple-developer-merchantid-domain-association |
The two files are different. Serve the sandbox file while you test, and replace it with the production file before you register the domains in production.
Serve the file unchanged at https://<your domain>/.well-known/apple-developer-merchantid-domain-association, with no file extension, on every domain and subdomain that shows the button. Register each of them, for example example.com and shop.example.com, separately.
PayMe fetches the file from every domain during the vas-enable call and compares it byte for byte with its own file for that environment. Check that the file is:
- served over HTTPS with status 200, with no redirect and no error page;
- exactly the file you downloaded from PayMe, never one generated in your own Apple developer account, with nothing added (not even a line break at the end);
- not blocked by a CDN or a firewall.
If any domain fails, the whole call fails with error 703 and a message naming the site: "Certificate does not match, please reconfigure." or "Cannot locate certificate." Fix the file and send the call again: nothing is left pending.
Step 2: Register your domains
Call vas-enable with the domains that show the button in vas_data.websites, up to 99 per call. PayMe checks each domain's file and registers the domains with Apple in the same call.
{
  "payme_client_key": "payme_partner_key",
  "seller_payme_id": "MPLDEMO-MPLDEMO-MPLDEMO-1234567",
  "vas_payme_id": "VASLDEMO-VASLDEMO-VASLDEMO-1234567",
  "vas_data": {
    "websites": ["example.com", "shop.example.com"]
  }
}
The response's vas_data.websites lists the approved domains, PayMe's own host included. To add a domain later, call vas-enable again with the new domain: domains already approved stay approved. (Partners can also use vas-update; contact PayMe support for its details.) See vas-enable for the response and errors.
Step 3: Get the testing account
PayMe provides a testing iCloud account, and the test cards are in Apple Pay testing information. Ask PayMe which environment to test Apple Pay in.
Devices you can test on: iPhone 6 or later, iPad mini 3 or later, iPad Air 2, iPad Pro and Apple Watch. You can't test on a Mac.
Step 4: Create the sale
On your server, create the sale with generate-sale and sale_payment_method: "apple-pay". It authenticates with seller_payme_id; never send this call from the browser.
POST https://sandbox.payme.io/api/generate-sale (production: https://live.payme.io/api/generate-sale)
{
  "seller_payme_id": "MPLDEMO-MPLDEMO-MPLDEMO-1234567",
  "sale_price": 1000,
  "currency": "ILS",
  "product_name": "Order 1234",
  "sale_payment_method": "apple-pay"
}
{
  "status_code": 0,
  "sale_url": "https://sandbox.payme.io/sale/generate/SALE1655-3843870J-NTPYLJNW-SOWRLK9X",
  "payme_sale_id": "SALE1655-3843870J-NTPYLJNW-SOWRLK9X",
  "payme_sale_code": 1027305,
  "price": 1000,
  "transaction_id": "",
  "currency": "ILS",
  "sale_payment_method": "apple-pay"
}
Pass payme_sale_id to your page: appleSale() takes it as saleGuid.
Step 5: Show the Apple Pay button
Load the scripts
Load Apple's apple-pay-sdk.js, which provides the <apple-pay-button> element, and PayMe's SDK, which provides the global PayMe:
<script src="https://applepay.cdn-apple.com/jsapi/v1/apple-pay-sdk.js"></script>
<script src="https://cdn.payme.io/hf/v1/hostedfields.js"></script>
If your site sets a Content Security Policy, allow script-src https://cdn.payme.io https://applepay.cdn-apple.com, frame-src https://hf.payme.io and connect-src https://sandbox.payme.io https://live.payme.io.
Add the button
Follow Apple's buttons and marks guidelines. Give the button an id or a class: you pass its selector to the SDK.
<apple-pay-button id="pay-with-apple-pay" buttonstyle="black" type="buy" locale="he-IL"></apple-pay-button>
buttonstyle, type and locale are Apple's attributes: see Apple's button documentation.
Check that Apple Pay is available
Show the button only when both checks pass:
| Check | Returns true when |
|---|---|
PayMe.isApplePayAvailable() |
The browser has Apple Pay (window.ApplePaySession exists) |
PayMe.isSupportsApplePayVersion() |
The browser supports Apple Pay JS API version PayMe.applePayApiVersion (4) |
instance.isMerchantSupportsApplePay(merchantId) |
Optional: Apple Pay is set up on the device (Apple's canMakePayments()) |
if (!(PayMe.isApplePayAvailable() && PayMe.isSupportsApplePayVersion())) {
  document.getElementById('pay-with-apple-pay').classList.add('hidden');
}
Start the sale
const publicKey = 'xxxxxxxx-xxxx-xxxx-xxxx-xxxxxxxxxxxx'; // the seller's public key
const paymeSaleId = 'SALE1655-3843870J-NTPYLJNW-SOWRLK9X'; // from Step 4
const testMode = true; // false in production

const instance = await PayMe.create(publicKey, { testMode });

let sale;
try {
  sale = instance.appleSale({ merchantId: 'merchant.paymeproduction', saleGuid: paymeSaleId });
} catch (error) {
  // error.message is PayMe.ERR_MESSAGES.NOT_SUPPORTED_DEVICE, NO_APPLE_PAY or NOT_SUPPORTED_VERSION:
  // hide Apple Pay and offer another payment method.
}

if (sale) {
  sale.letsRock({
    payButtonSelector: '#pay-with-apple-pay',
    buttonLocale: 'he', // optional: sets locale="he-IL" on the <apple-pay-button>
    canceled() {
      // the buyer closed the Apple Pay sheet
    },
    validated(err) {
      // PayMe finished Apple's merchant validation; err is set if it failed
    },
    paymentCompleted(err, result) {
      if (err) return showError(err.message); // "<status_error_code>:<status_error_details>" for PayMe errors
      if (result.sale_status === 'completed') confirmOnServer(result.payme_sale_id);
      else showError(result.status_error_details);
    },
  }).catch((err) => showError(err.message)); // config errors, VALIDATION_NO_NETWORKS, PayMe errors
}
appleSale() options:
| Option | Required | What it is |
|---|---|---|
saleGuid |
Yes | The payme_sale_id from Step 4 |
merchantId |
Yes | Pass merchant.paymeproduction. The SDK uses it only for the device check; the identifier Apple validates comes from the seller's Apple Pay service. |
debugFn |
No | A function that receives the SDK's debug messages |
letsRock(config) takes the button's selector as a string, or this object:
| Key | Default | What it does |
|---|---|---|
payButtonSelector |
none | A CSS selector for your Apple Pay button |
buttonLocale |
none | Sets the locale of an <apple-pay-button>: en becomes en-US, he becomes he-IL, and a value with a region, such as fr-FR, is used as is |
canceled() |
does nothing | Called when the buyer closes the Apple Pay sheet |
validated(err) |
does nothing | Called after PayMe completes Apple's merchant validation, before the buyer authorizes the payment. err is set if the validation failed. |
paymentCompleted(err, result) |
does nothing | Called with the payment's result. result is the sale: payme_sale_id, sale_status, payme_transaction_auth_number, buyer_card_mask… |
The callbacks must be plain functions or arrow functions, not async functions: an async callback makes letsRock() reject with a validation:invalid-type-for-…-callback error.
Treat the order as paid only when result.sale_status is completed, and confirm it with the sale callback on your server before you fulfil.
letsRock() resolves to a start function and attaches it to your button's click. Other methods on the sale:
sale.setButtonLocale(locale)changes the button's locale later.sale.destroy()detaches the button and aborts an open Apple Pay session. Call it before you start a new sale on the same page.sale.manual()returns{ verify, preparePayment }, the two stepsletsRock()runs. You don't need it withletsRock().
Start the payment from your own control
If your page has no Apple Pay button for the SDK to find, give letsRock() a selector that matches nothing, and call the start function it resolves to from your own click handler:
sale.letsRock('.no-apple-pay-button').then((startPayment) => {
  document.getElementById('my-custom-button').addEventListener('click', startPayment);
});
Only a user action can start an Apple Pay payment. Call startPayment synchronously inside a click or tap handler. A call from a timer, or from a postMessage that a timer sent, fails with Apple's error "Must create a new ApplePaySession from a user gesture handler" (Apple's documentation).
Inside another site's iframe
Apple validates the top-level page's domain. When the SDK runs inside another site's iframe, pass that domain, which must be registered in Step 2:
const instance = await PayMe.create(publicKey, { testMode, domainName: 'shop.example.com' });
Step 6: Test your integration
- Put the test page below on your registered domain, for example
https://shop.example.com/apple-pay-test.html. - Create a sale as in Step 4.
- Open the page in Safari on a test device, fill in the seller's public key and the sale ID, and select Start interaction.
- Pay with Apple Pay, and check that
paymentCompletedand your sale callback both report the sale.
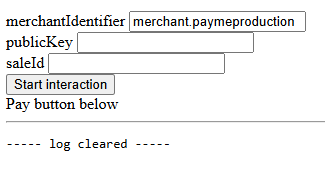
<!doctype html>
<html lang="en">
<head>
  <meta charset="UTF-8">
  <meta name="viewport" content="width=device-width, initial-scale=1.0">
  <title>Apple Pay test page</title>

  <style>
    .hidden { display: none; }
    label { display: block; margin-bottom: 12px; }
    input { display: block; width: 100%; max-width: 420px; padding: 8px; }
  </style>

  <script src="https://applepay.cdn-apple.com/jsapi/v1/apple-pay-sdk.js"></script>
  <script src="https://cdn.payme.io/hf/v1/hostedfields.js"></script>
</head>
<body>
<form id="init-payment-form">
  <label>merchantIdentifier
    <input id="merchantIdentifier" value="merchant.paymeproduction">
  </label>
  <label>publicKey
    <input id="publicKey" value="XXXXXXXX-XXXX-XXXX-XXXX-XXXXXXXXXXXX">
  </label>
  <label>saleId
    <input id="saleId" value="SALE1655-3843870J-NTPYLJNW-SOWRLK9X">
  </label>
  <button id="start-interaction">Start interaction</button>
</form>

<div class="hidden" id="applepay-button-wrapper">
  <div>Pay button below</div>
  <apple-pay-button id="pay-with-apple-pay" buttonstyle="black" type="buy" locale="he-IL"></apple-pay-button>
</div>

<hr>

<pre id="console-pre"></pre>

<script>
  const consolePre = document.getElementById('console-pre');
  const log = (txt) => { consolePre.innerText += txt + '\n'; };
  const clear = () => { consolePre.innerText = '----- log cleared -----\n\n'; };

  // The same environment as the public key and the sale: true for sandbox, false for production.
  const testMode = false;
  let currentSale;

  function startApplePay({ merchantIdentifier, publicKey, saleId }) {
    return PayMe.create(publicKey, { testMode, language: 'he' }).then((instance) => {
      const sale = instance.appleSale({ debugFn: log, merchantId: merchantIdentifier, saleGuid: saleId });

      // letsRock also accepts just the button's selector.
      sale.letsRock({
        payButtonSelector: '#pay-with-apple-pay',
        canceled: () => log('Cancelled'),
        validated: (err) => log(err ? 'Validation error: ' + err.message : 'Validated'),
        paymentCompleted: (err, result) => log(err ? 'Payment error: ' + err.message : 'Completed: ' + JSON.stringify(result, null, 2)),
      })
        .then(() => log('Sale initialized'))
        .catch((err) => log('Sale initialization error: ' + err.message));

      return sale;
    });
  }

  const form = document.getElementById('init-payment-form');
  const buttonWrapper = document.getElementById('applepay-button-wrapper');

  log(PayMe.isApplePayAvailable() ? 'Apple Pay available' : 'Apple Pay unavailable');
  log(PayMe.isSupportsApplePayVersion()
    ? `Apple Pay version ${PayMe.applePayApiVersion} supported`
    : 'This Apple Pay version is not supported');

  form.addEventListener('submit', (event) => {
    event.preventDefault();
    clear();

    if (currentSale) {
      currentSale.destroy();
      buttonWrapper.classList.add('hidden');
    }

    startApplePay({
      merchantIdentifier: document.getElementById('merchantIdentifier').value,
      publicKey: document.getElementById('publicKey').value,
      saleId: document.getElementById('saleId').value,
    })
      .then((sale) => {
        currentSale = sale;
        buttonWrapper.classList.remove('hidden');
      })
      .catch((err) => {
        // appleSale() throws NOT_SUPPORTED_DEVICE, NO_APPLE_PAY or NOT_SUPPORTED_VERSION here.
        buttonWrapper.classList.add('hidden');
        log(err.message);
      });
  });
</script>
</body>
</html>
Errors
The SDK reports errors as an Error whose message is one of the values in PayMe.ERR_MESSAGES, or a PayMe error.
PayMe.ERR_MESSAGES key |
message |
When | Raised by |
|---|---|---|---|
NOT_SUPPORTED_DEVICE |
no-supported:apple-pay-not-available-for-device |
The browser has no Apple Pay (window.ApplePaySession is missing) |
instance.appleSale() throws |
NO_APPLE_PAY |
no-supported:apple-pay-jsapi-not-available |
Apple Pay isn't set up on the device (canMakePayments() returned false) |
instance.appleSale() throws |
NOT_SUPPORTED_VERSION |
no-supported:apple-pay-version-not-supported |
The browser doesn't support Apple Pay JS API version 4. There is no workaround: offer another payment method. | instance.appleSale() throws |
VALIDATION_NO_NETWORKS |
validation-error:no-supported-networks |
None of the seller's card brands is supported by Apple Pay. Contact PayMe support. | letsRock() rejects |
INVALID_CFG_PARAM |
validation:unknown-configuration-parameter |
letsRock() got something other than a selector or a config object |
letsRock() rejects |
INVALID_VALIDATED_CB, INVALID_CANCELLED_CB, INVALID_COMPLETED_CB |
validation:invalid-type-for-validated-callback, validation:invalid-type-for-cancelled-callback, validation:invalid-type-for-payment-completed-callback |
That callback isn't a plain function (for example, it is async) |
letsRock() rejects |
When PayMe rejects a call (the sale doesn't exist or isn't payable, the service isn't enabled, the merchant validation failed, the payment was declined), letsRock() rejects, or validated(err) or paymentCompleted(err) gets an Error whose message is "<status_error_code>:<status_error_details>".
The message values are codes, not text for buyers. Map them to your own messages:
const messages = PayMe.ERR_MESSAGES;

const buyerMessages = {
  [messages.NOT_SUPPORTED_DEVICE]: 'This device does not support Apple Pay',
  [messages.NO_APPLE_PAY]: 'Apple Pay is not set up on this device',
  [messages.NOT_SUPPORTED_VERSION]: 'This device does not support the current Apple Pay version',
  [messages.VALIDATION_NO_NETWORKS]: 'Apple Pay is not available for this seller',
};

function showError(code) {
  alert(buyerMessages[code] ?? 'Apple Pay is not available. Please choose another payment method.');
}