Accept Google Pay
Google Pay™ lets buyers pay with the cards saved in their Google account. It works for one-time sales, including multi sales where the buyer chooses how to pay.
PayMe accepts Visa, Mastercard, American Express, Discover and JCB through Google Pay. If one of these networks is missing on your PayMe account, ask PayMe support (support@payme.io) to add it.
You can offer it in two ways:
- On PayMe's Hosted Payment Page. Enable the service, create a sale with
sale_payment_method: "google-pay"(ormulti), and send the buyer to itssale_url. PayMe shows the Google Pay button. - On your own page, with the browser SDK's
googleSale(): register with Google, enable the service, create the sale, and render the button. The steps are below.
Enable Google Pay
A seller installs Google Pay from the dashboard app store (חנות אפליקציות), and it is active as soon as it is installed. A partner enables it for its seller with vas-enable. Without the service, generate-sale with google-pay fails with error 720.
Limitations
- Google Pay is for one-time payments only: it can't pay a subscription. Use a card or Apple Pay for recurring payments.
- Installments aren't available: a sale with
sale_payment_method: "google-pay"and more than one installment fails with error351. On amultipage that lets the buyer choose the number of installments, a buyer who pays with Google Pay pays in a single payment. - Approved domains are managed in the Google Pay & Wallet Console of the merchant-ID owner, not in PayMe. Google error codes (for example
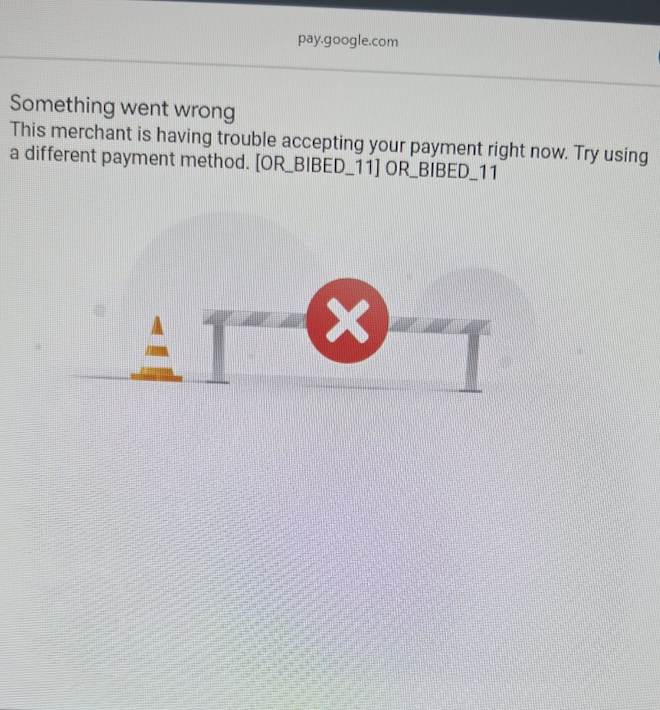
OR_BIBED_11) come from Google.
Google Pay terms
By integrating Google Pay, you agree to the Google Pay and Wallet API Acceptable Use Policy and accept Google's terms of service.
On your own page
Step 1: Register in the Google Pay & Wallet Console
Before you show Google Pay on your own page, register your domain with Google:
Go to the Google Pay & Wallet Console: https://pay.google.com/business/console
Enter your business name in English, and check the first checkbox.
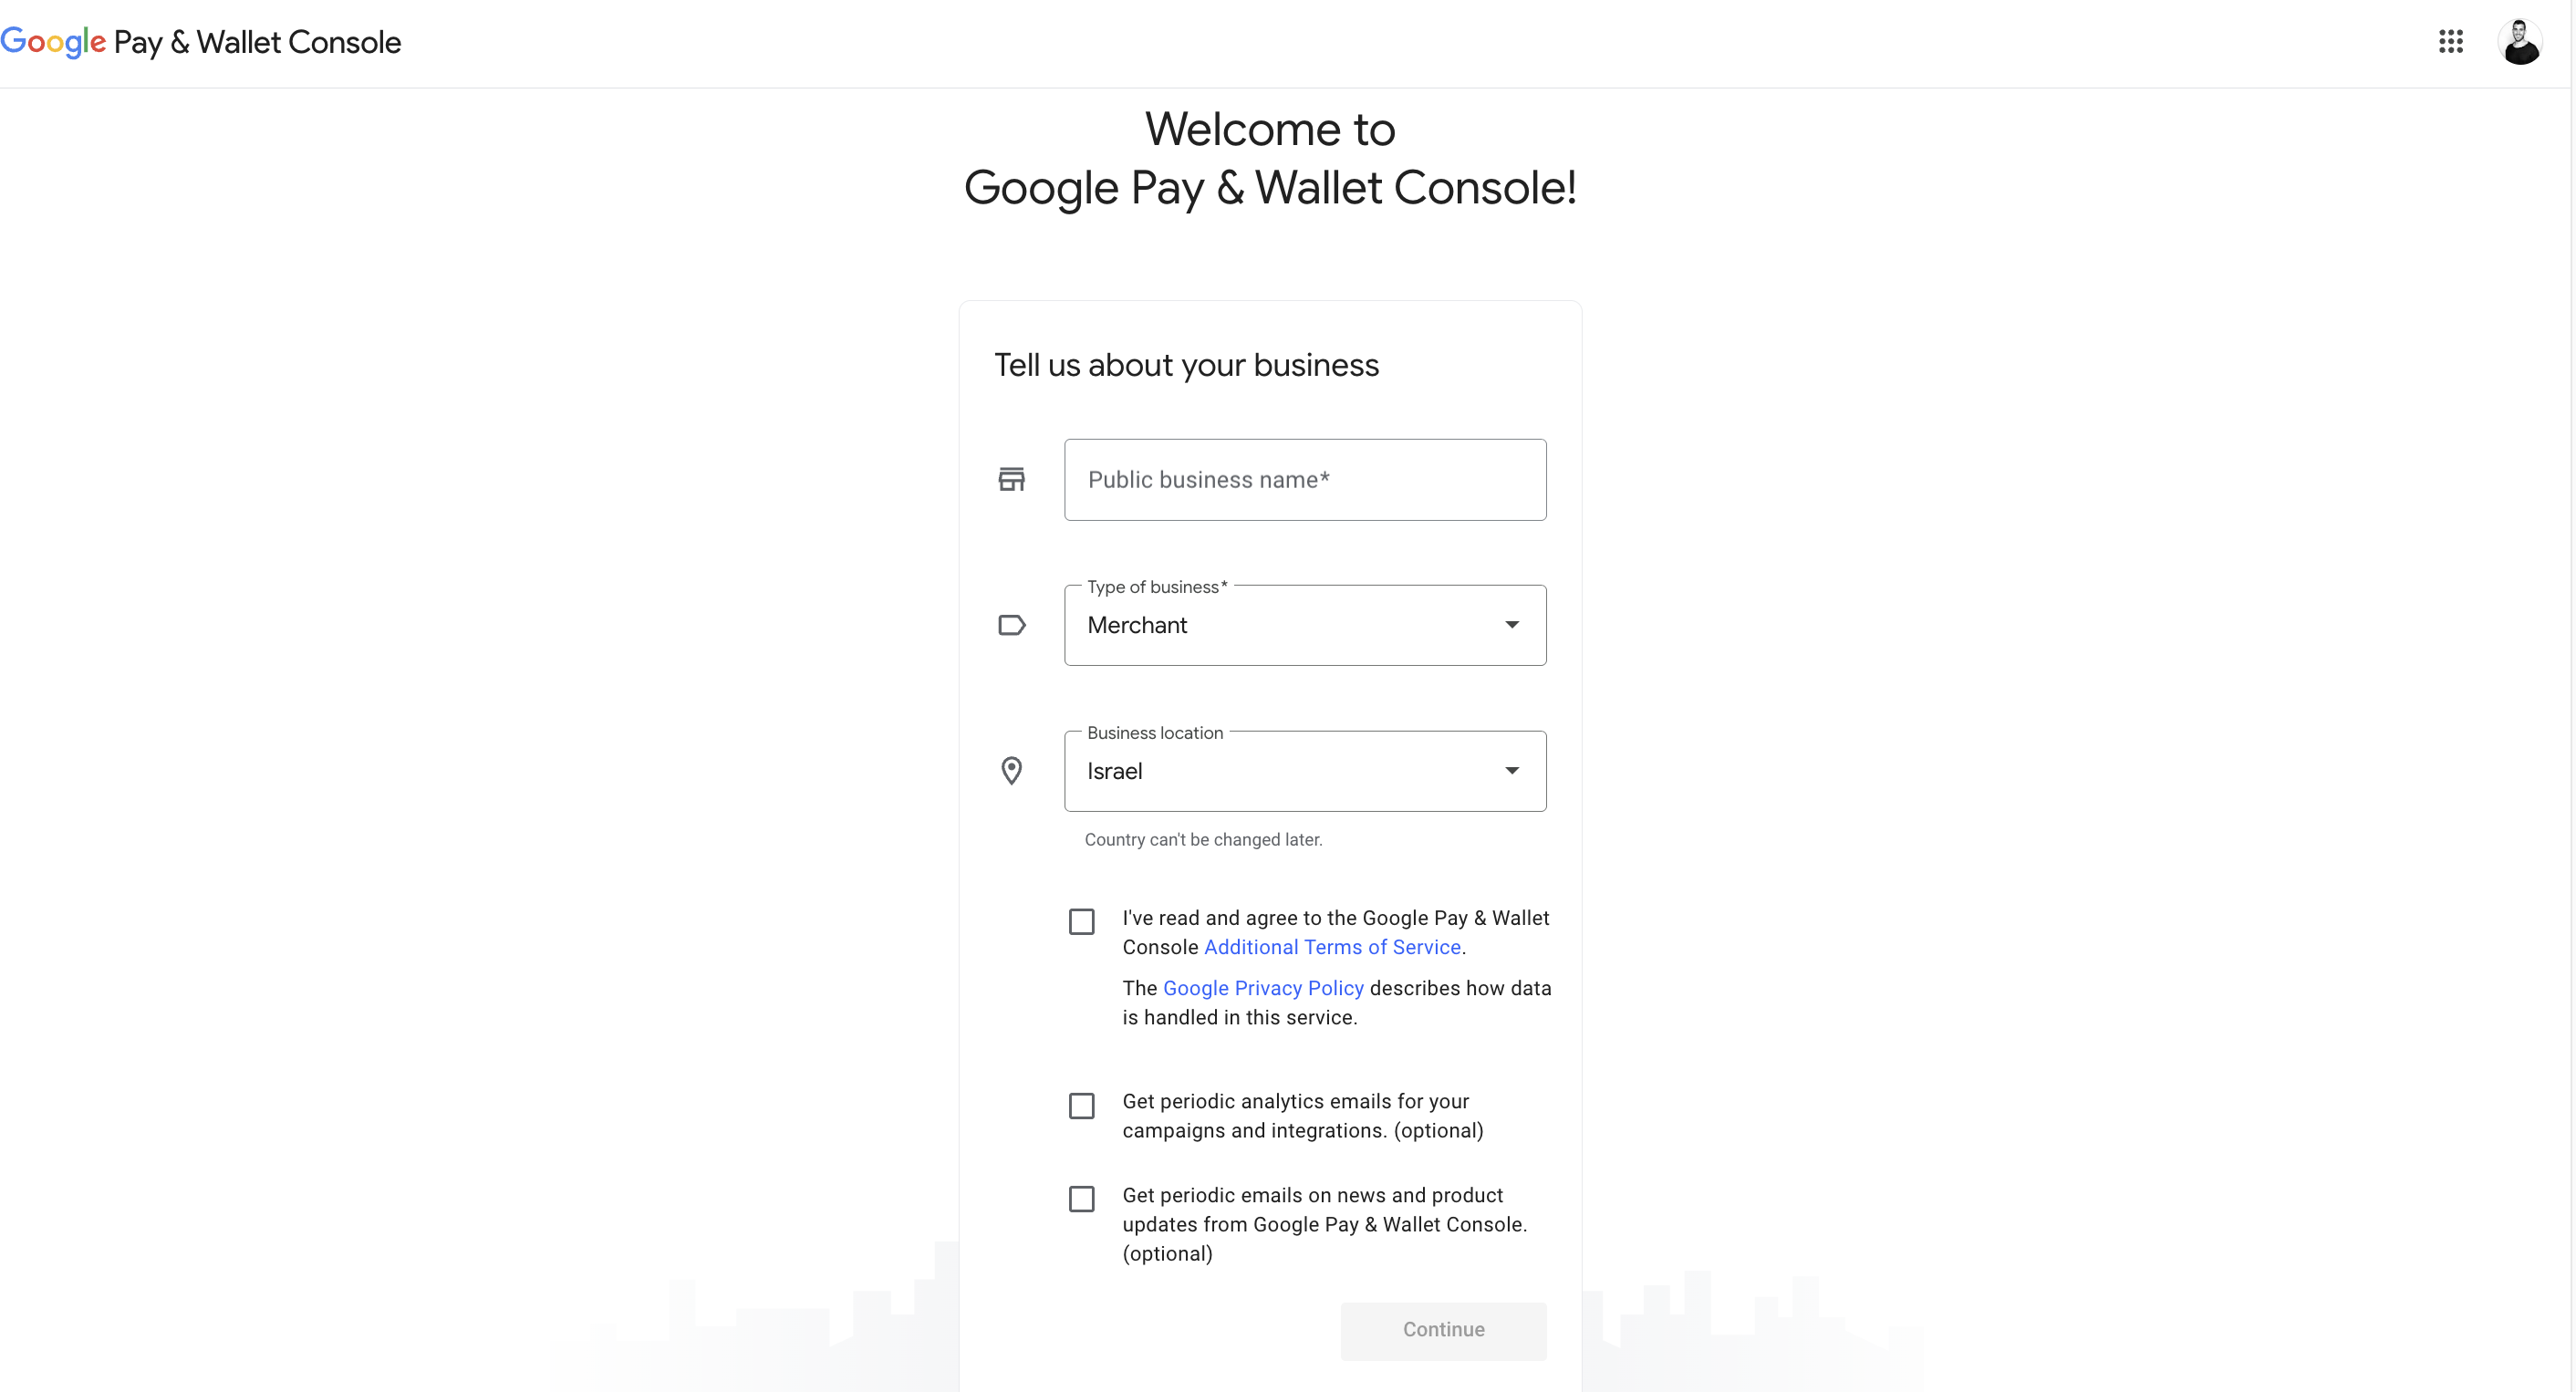
Select Google Pay API, then Create an integration.
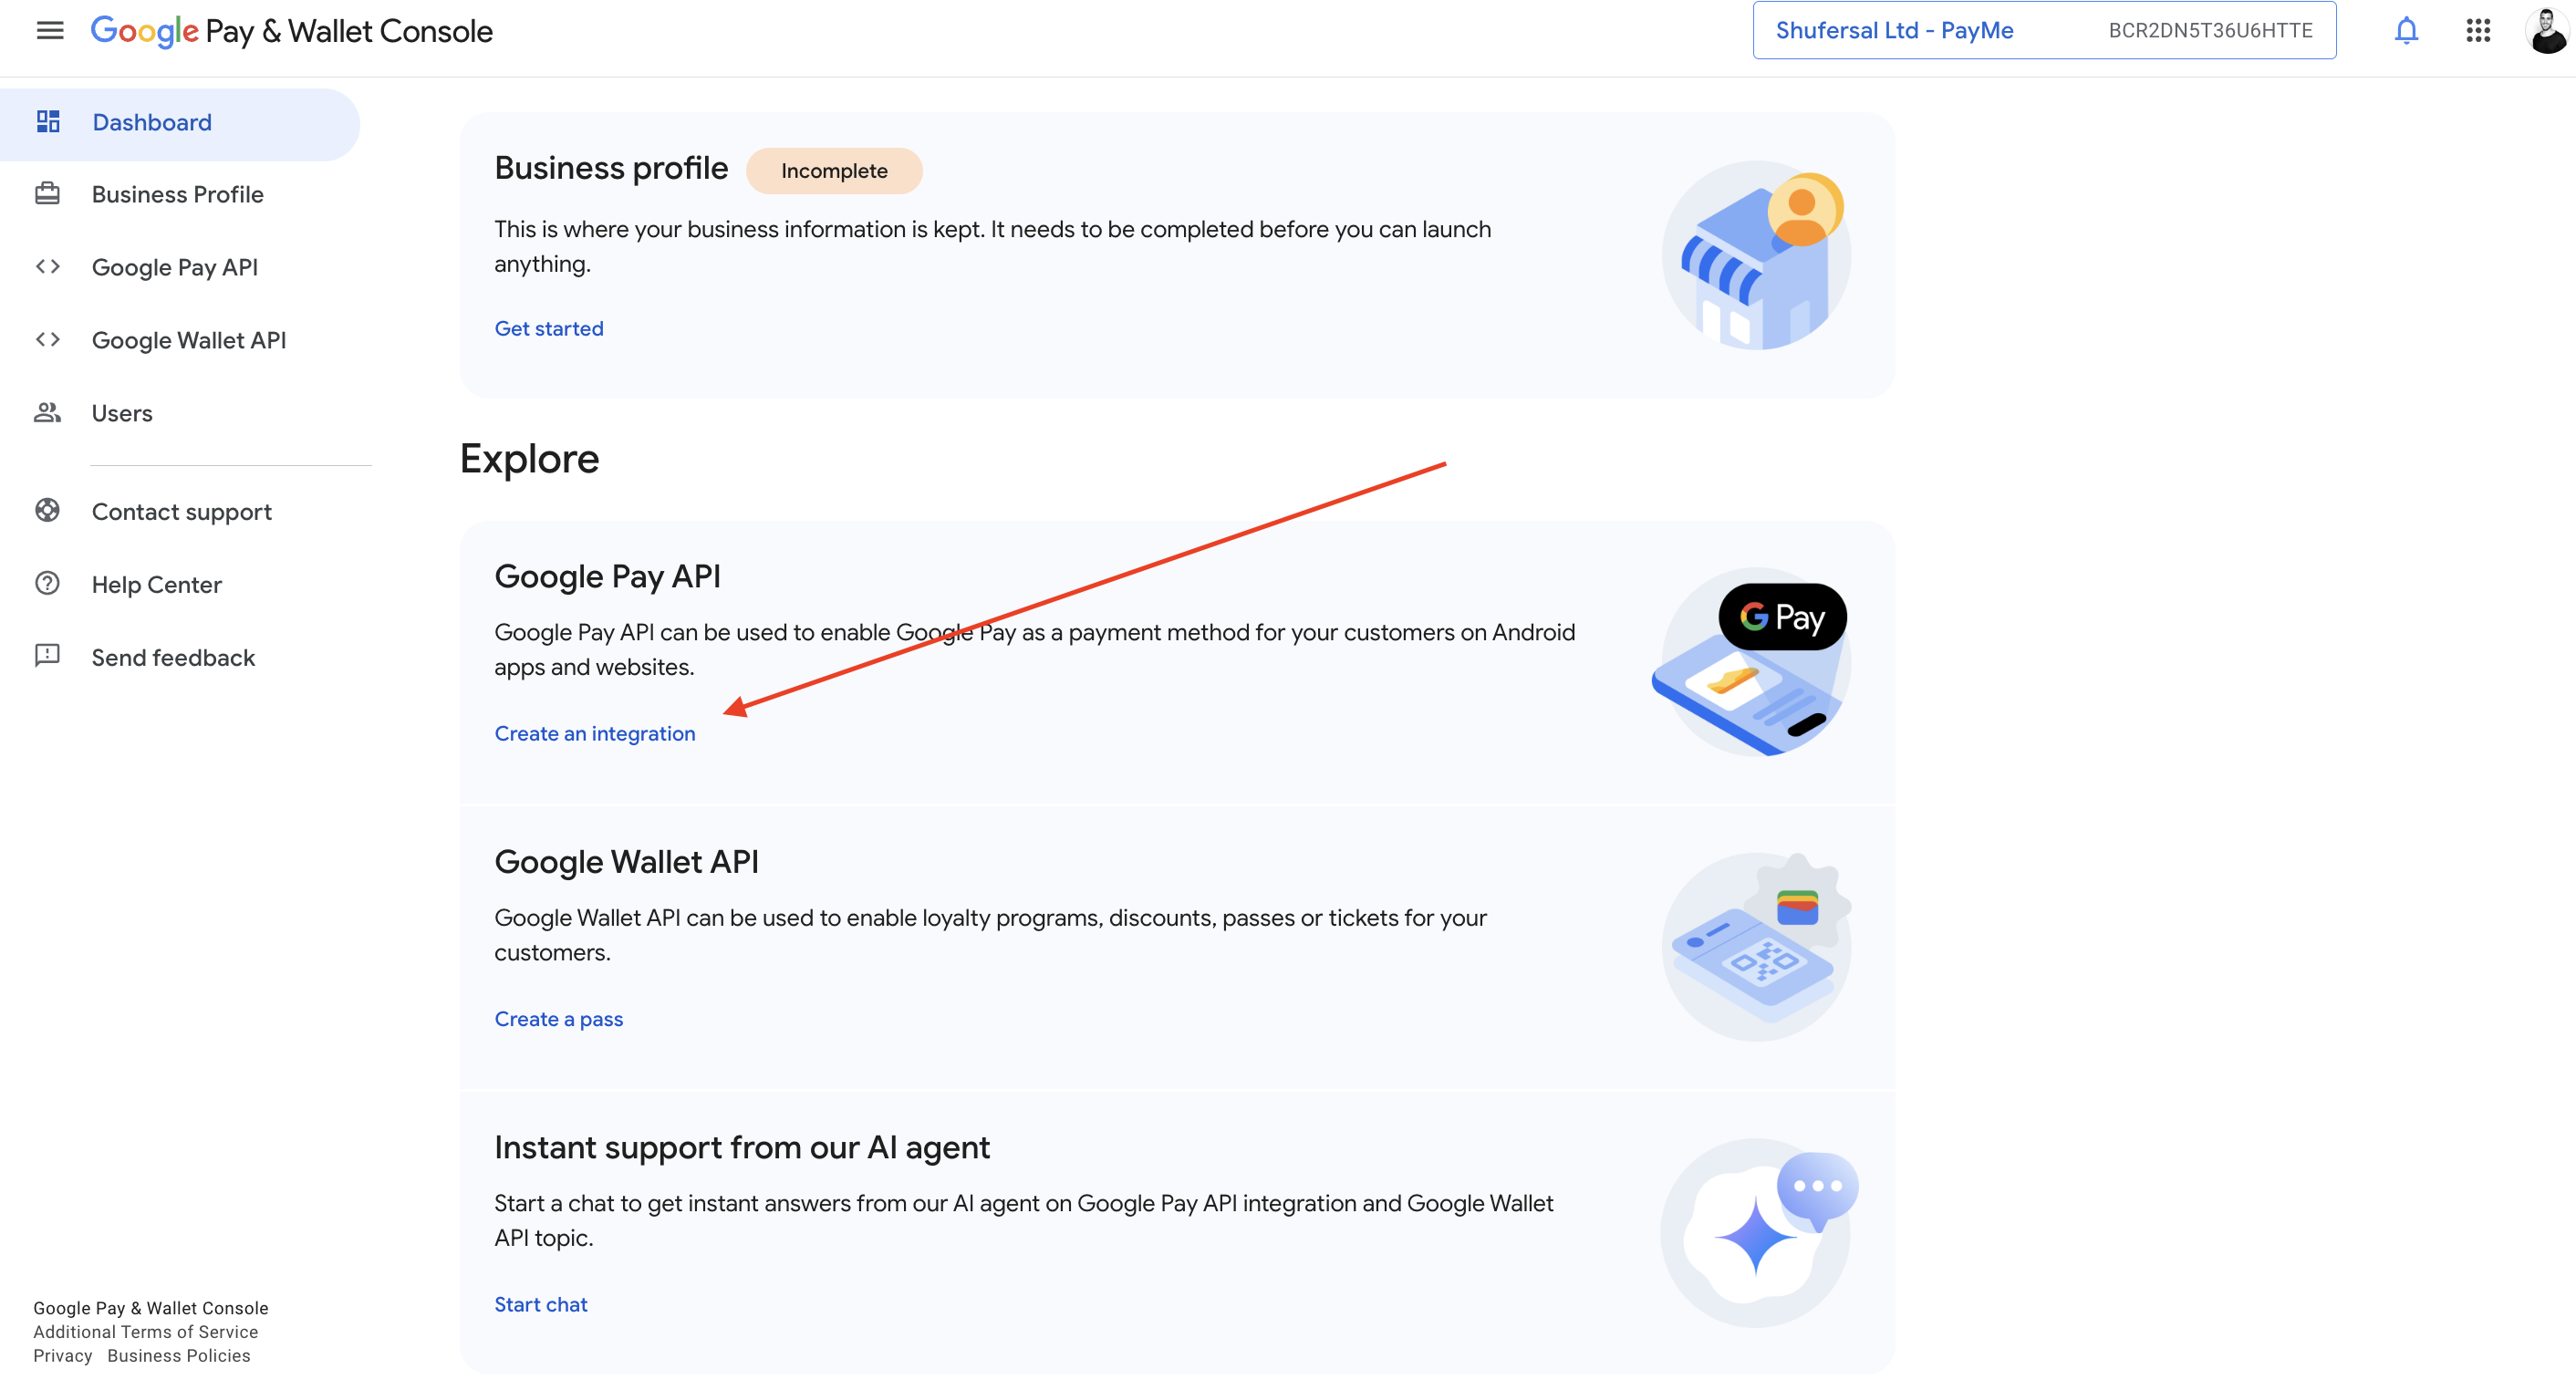
Choose Web integration.
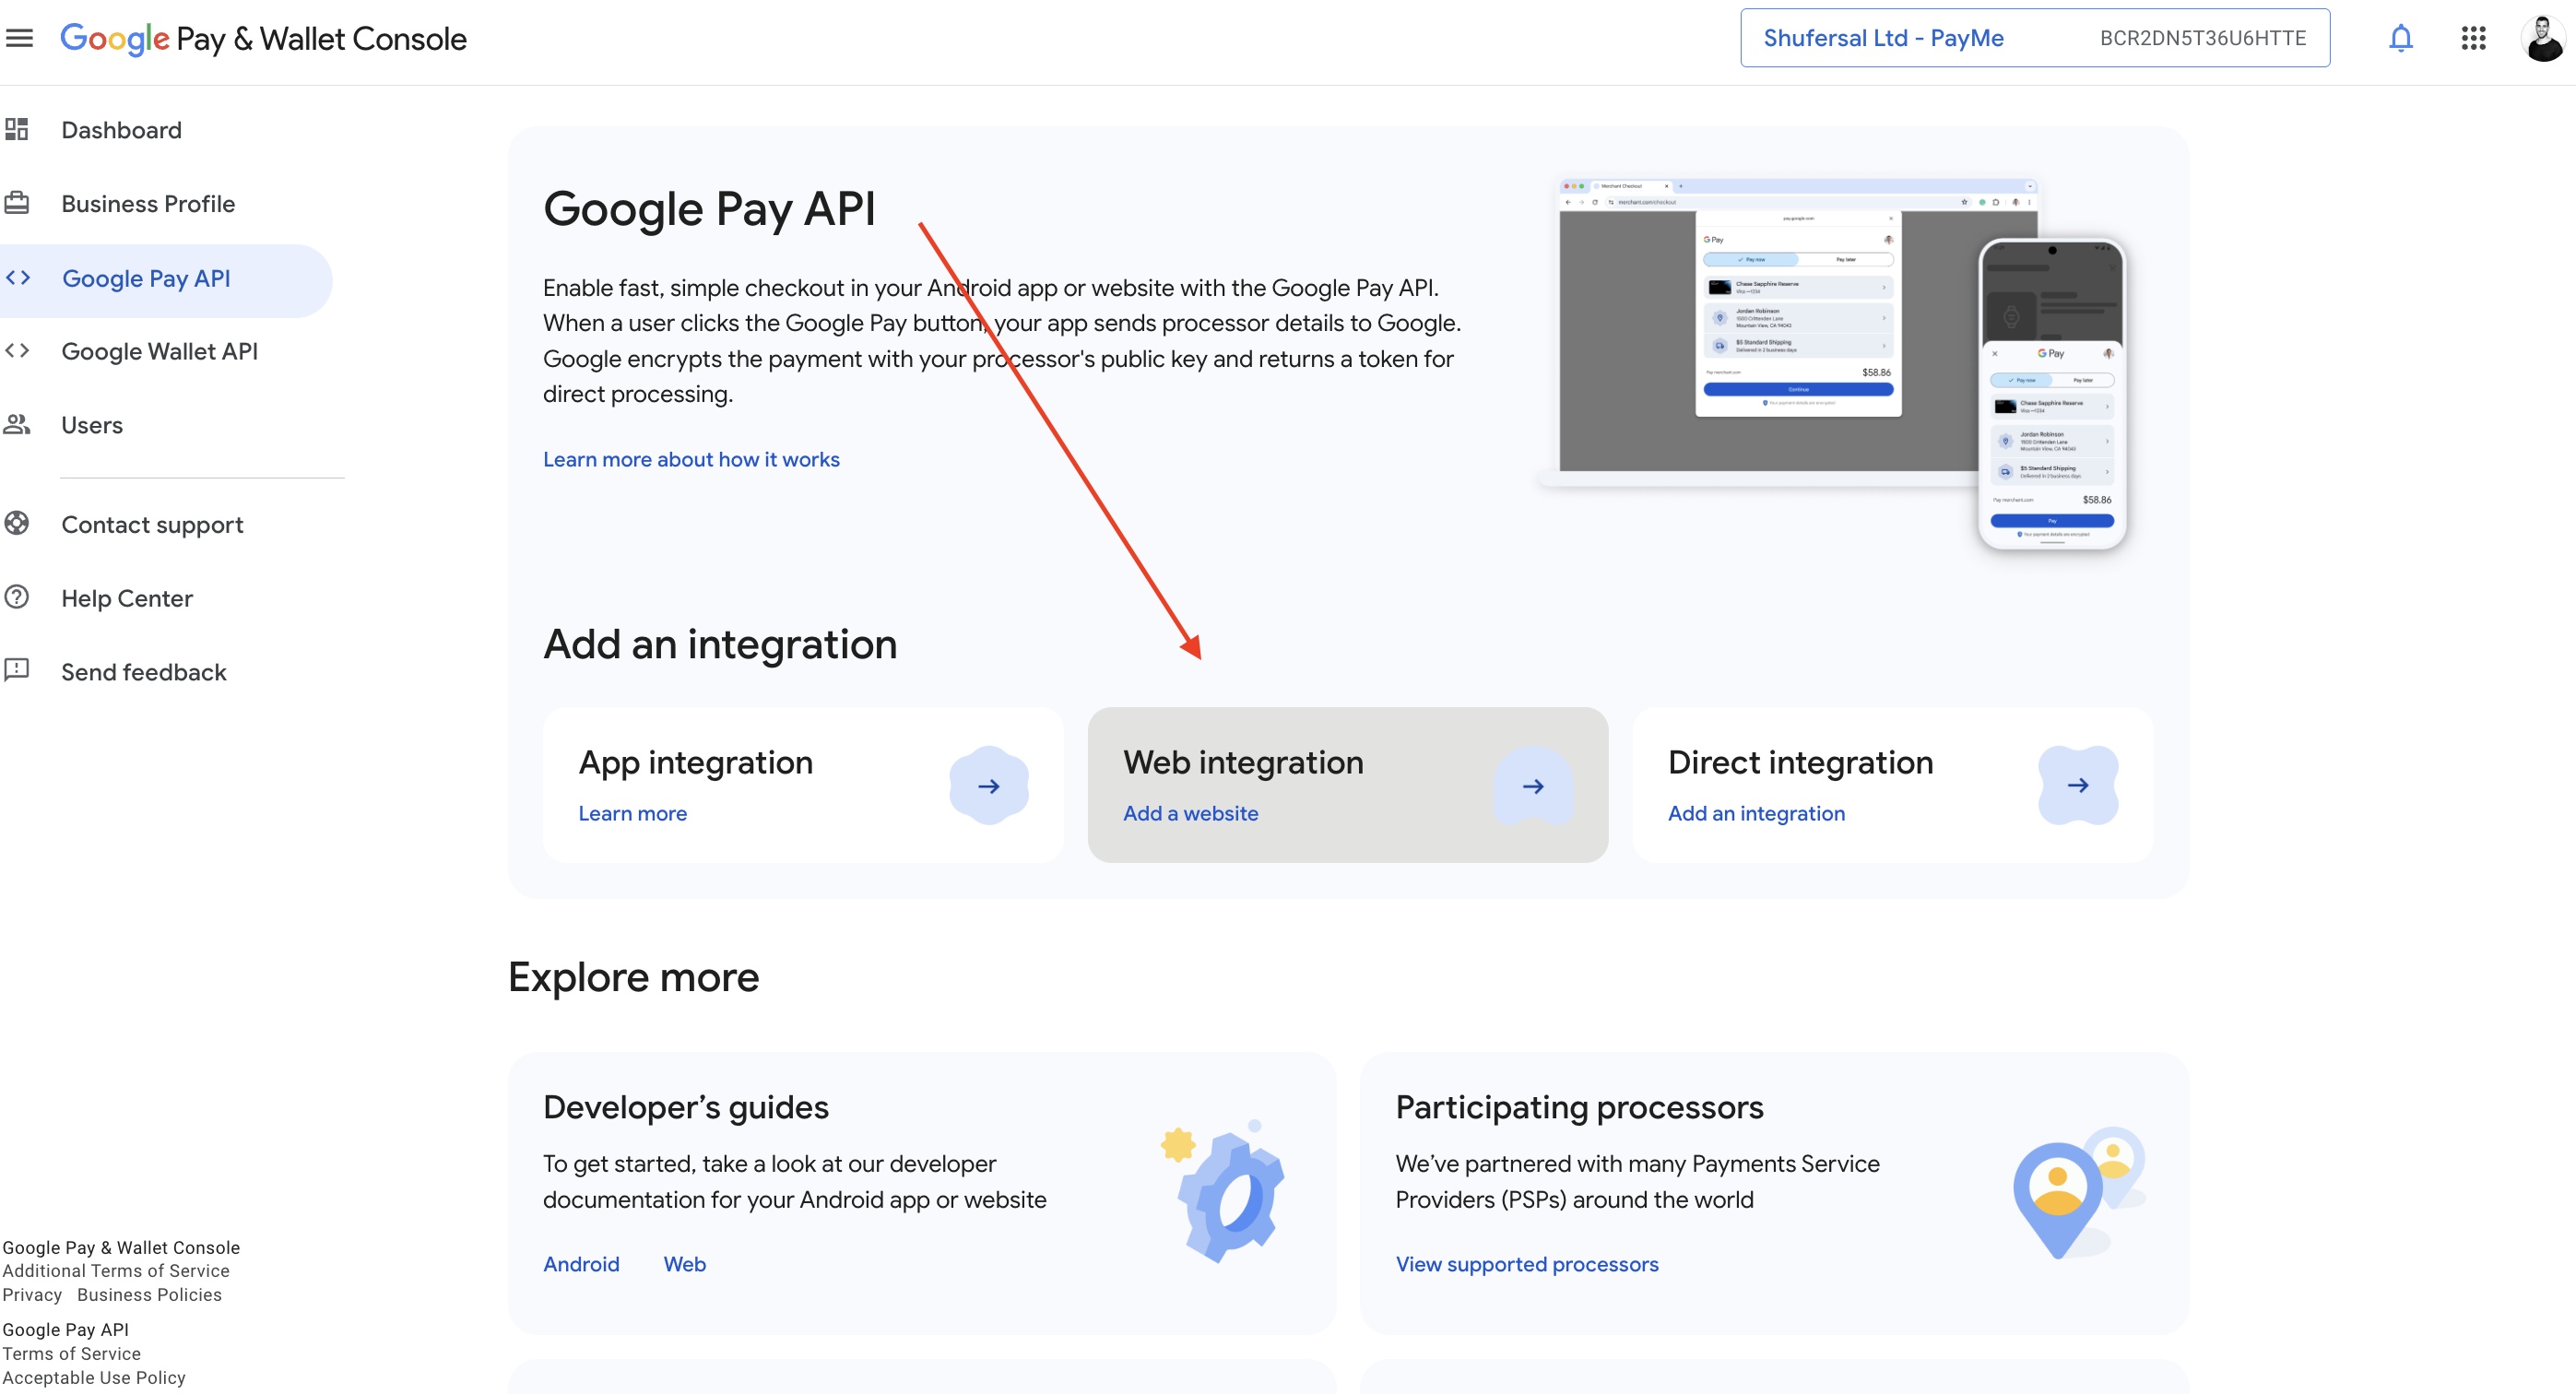
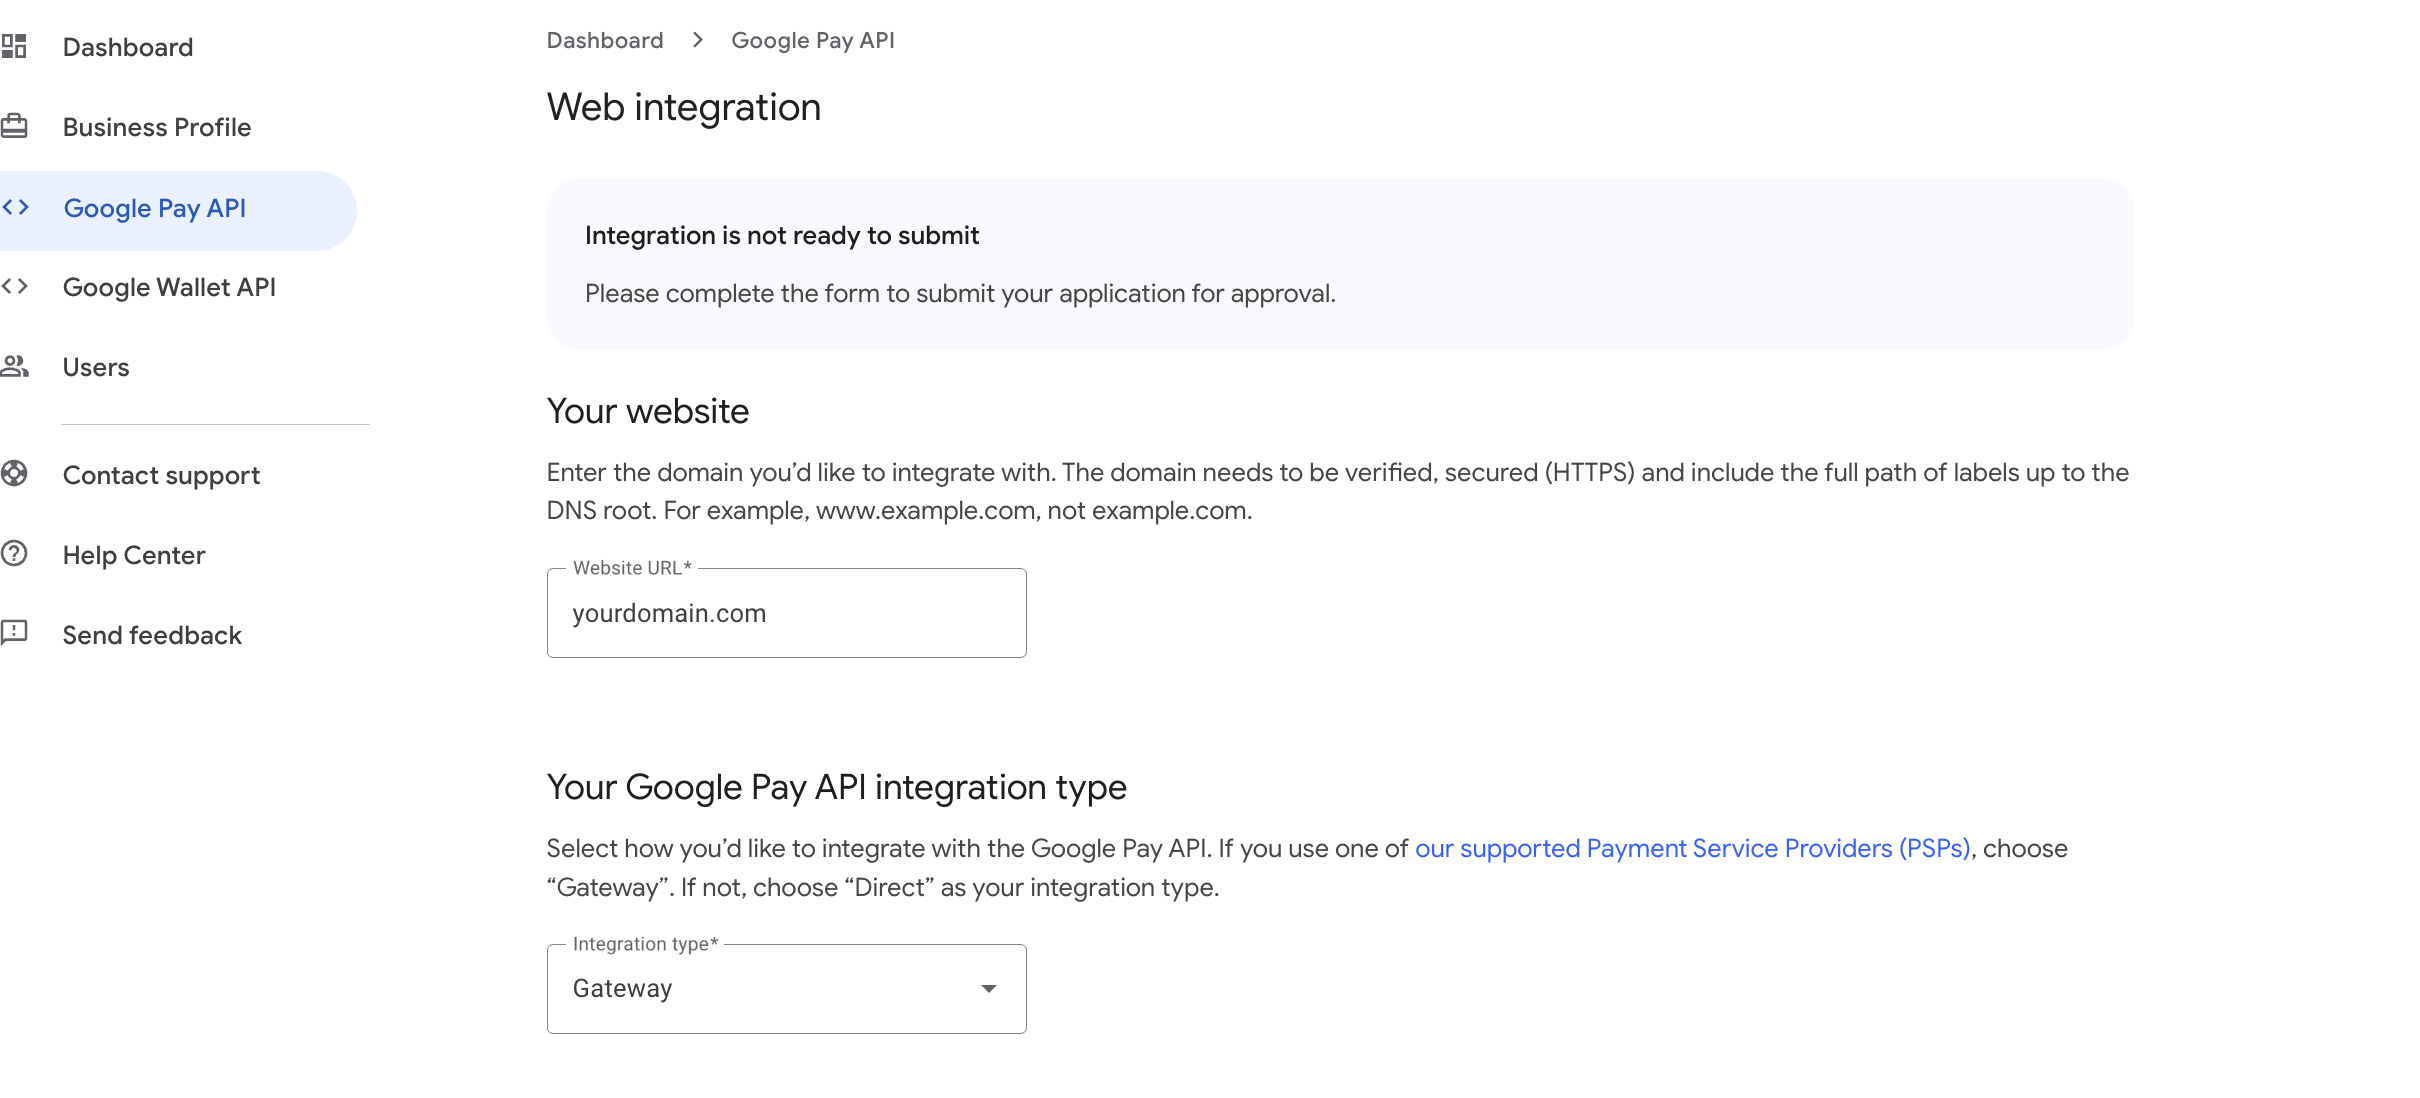
Under Your website, enter your website's URL. Under Your Google Pay API integration type, select Gateway.
In Screenshots of your buyflow, upload a screenshot of each step Google asks for, taken on your site.
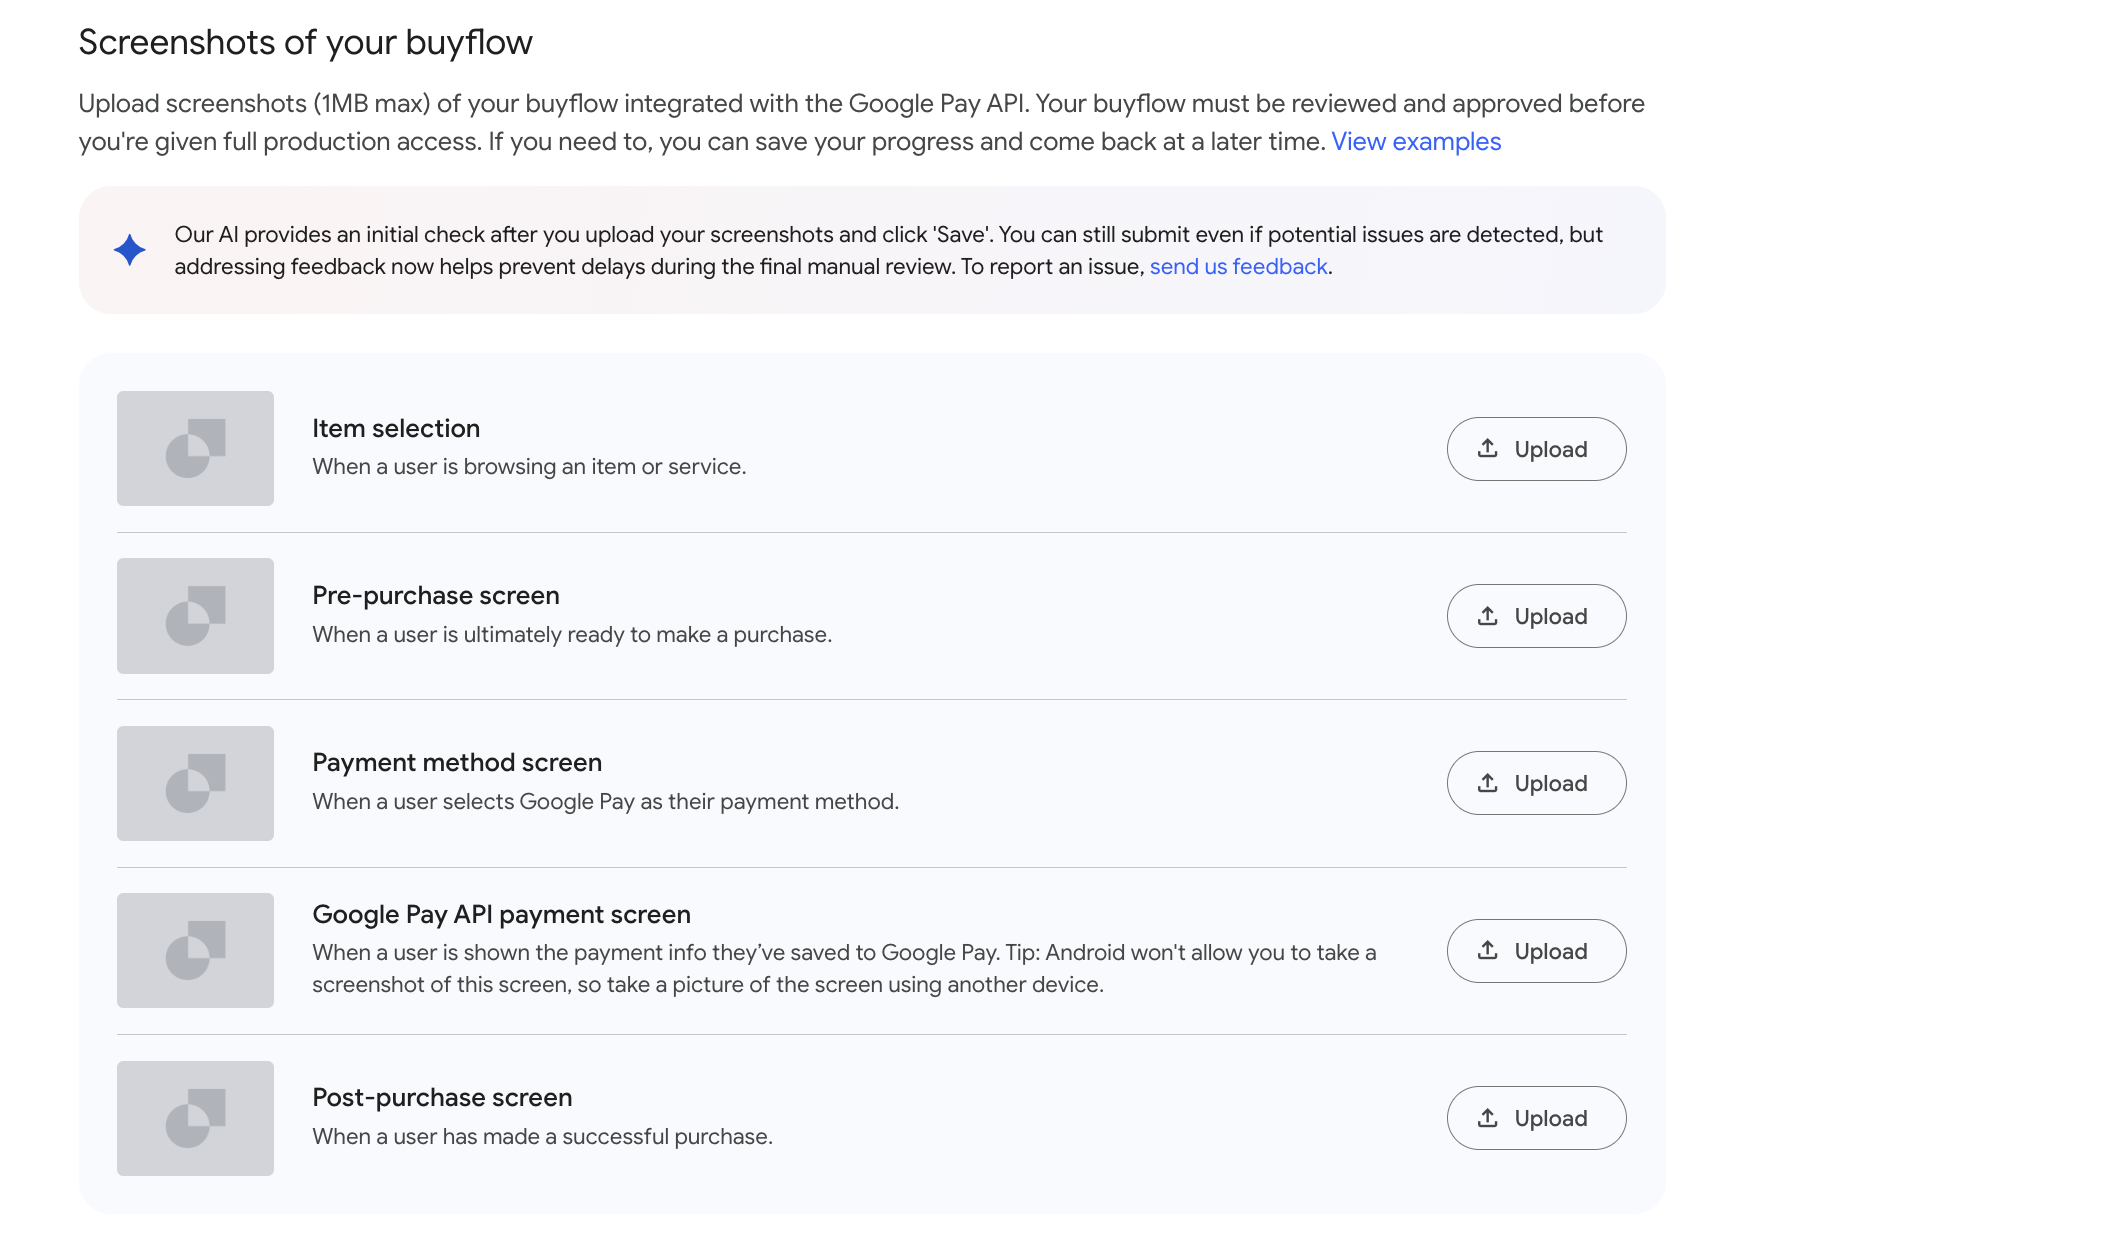
For the Google Pay API payment screen, upload a screenshot of this error:
A nonprofit organization must also complete steps 1 to 3 of the Google for Nonprofits validation.
When the registration is complete, email PayMe Partners (partners@payme.io) to confirm it. PayMe continues the setup on its side.
Step 2: Enable Google Pay
See Enable Google Pay. A partner calls vas-enable with its Google Pay service ID:
{
  "payme_client_key": "payme_partner_key",
  "seller_payme_id": "MPLDEMO-MPLDEMO-MPLDEMO-1234567",
  "vas_payme_id": "VASLDEMO-GOOGLEPAY-VASLDEMO-1234567"
}
Step 3: Create a Google Pay sale
On your server, create the sale with generate-sale and sale_payment_method: "google-pay". Set sale_callback_url and sale_return_url: a payment that needs 3D Secure ends there (see Step 5).
POST https://sandbox.payme.io/api/generate-sale (production: https://live.payme.io/api/generate-sale)
{
  "seller_payme_id": "MPLDEMO-MPLDEMO-MPLDEMO-1234567",
  "sale_price": 1000,
  "currency": "ILS",
  "product_name": "Order 1234",
  "sale_payment_method": "google-pay",
  "sale_callback_url": "https://www.example.com/payment/callback",
  "sale_return_url": "https://www.example.com/payment/success"
}
{
  "status_code": 0,
  "sale_url": "https://sandbox.payme.io/sale/generate/SALE1655-3843870J-NTPYLJNW-SOWRLK9X",
  "payme_sale_id": "SALE1655-3843870J-NTPYLJNW-SOWRLK9X",
  "payme_sale_code": 1027305,
  "price": 1000,
  "transaction_id": "",
  "currency": "ILS",
  "sale_payment_method": "google-pay"
}
Pass payme_sale_id to your page: googleSale() takes it as saleGuid.
Step 4: Show the Google Pay button
Use the official Google Pay button and logo, unchanged, as the Google Pay web brand guidelines and Android brand guidelines require. Show the button only after the availability check passes, and always keep another payment method available.
4.1 Load the PayMe SDK
<script src="https://cdn.payme.io/hf/v1/hostedfields.js"></script>
Use this URL in the sandbox and in production. The testMode option chooses the environment.
The SDK loads Google's https://pay.google.com/gp/p/js/pay.js itself. If your site sets a Content Security Policy, allow script-src https://cdn.payme.io https://pay.google.com, frame-src https://hf.payme.io and connect-src https://sandbox.payme.io https://live.payme.io, plus what Google Pay's own documentation requires.
4.2 Add a container for the button
The SDK renders Google's button into this element:
<div id="pay-with-google-pay"></div>
4.3 Check availability, then start
const publicKey = 'xxxxxxxx-xxxx-xxxx-xxxx-xxxxxxxxxxxx'; // the seller's public key
const paymeSaleId = 'SALE1655-3843870J-NTPYLJNW-SOWRLK9X'; // from Step 3
const testMode = true; // false in production

if (await PayMe.isGooglePayAvailable(testMode)) {
  const instance = await PayMe.create(publicKey, { testMode });

  const googleSale = instance.googleSale({
    saleGuid: paymeSaleId,
    debugFn: (message) => console.log('[PayMe]', message), // optional
  });

  await googleSale.letsRock({
    payButtonSelector: '#pay-with-google-pay',
    buttonType: 'buy',
    buttonColor: 'default',
    canceled() {
      // the buyer closed the Google Pay sheet
    },
    paymentCompleted(err, sale) {
      if (err) return showError(err.message); // "<status_error_code>:<status_error_details>"
      if (sale.status_code === 5 && sale.redirect_url) {
        window.location.assign(sale.redirect_url); // 3D Secure: the buyer completes it there
        return;
      }
      if (sale.sale_status === 'completed') confirmOnServer(sale.payme_sale_id);
    },
  });
} else {
  // hide Google Pay and offer another payment method
}
PayMe.isGooglePayAvailable(testMode) loads Google's script and asks Google whether the browser can pay. It resolves to false instead of rejecting.
googleSale() options:
| Option | Required | What it is |
|---|---|---|
saleGuid |
Yes | The payme_sale_id from Step 3 |
debugFn |
No | A function that receives the SDK's debug messages |
letsRock(config) takes the container's selector as a string, or this object:
| Key | Default | Values |
|---|---|---|
payButtonSelector |
none | A CSS selector for the container |
buttonType |
buy |
buy, book, checkout, donate, order, pay, plain, subscribe |
buttonColor |
default |
default, black, white |
buttonRadius |
4 |
The corner radius, in pixels |
buttonSizeMode |
fill |
fill (fills the container) or static |
buttonLocale |
the browser's language | A two-letter language code, e.g. en. Google can't render a Hebrew button, so he shows the logo-only plain button. |
canceled() |
does nothing | Called when the buyer closes the Google Pay sheet |
paymentCompleted(err, sale) |
does nothing | Called with the payment's result: see Step 5 |
The callbacks must be plain functions or arrow functions, not async functions: an async callback makes letsRock() reject with a validation:invalid-type-for-…-callback error.
letsRock() resolves to the start function, which the button's click already calls. Other methods on the sale:
googleSale.setButtonLocale(locale)re-renders the button in another language.googleSale.destroy()removes the button. Call it before you start a new sale on the same page.googleSale.manual()returns{ createButton(target), startPayment() }, to render the button into another element or start the payment from your own click handler.
Step 5: Handle the result
The buyer pays with a card saved in their Google account. Whether 3D Secure runs depends on the card, not on the device:
- A card stored on the buyer's device (Google's
CRYPTOGRAM_3DS) is charged directly. - A card saved in the Google account (
PAN_ONLY) always goes through PayMe's 3D Secure, on any device. This needs the seller's 3D Secure service; without it, the payment fails with error21017"Verification failed, please try again".
paymentCompleted(err, sale) gets one of these:
| You get | Meaning | What to do |
|---|---|---|
err is null, sale.status_code is 5, sale.redirect_url is set |
3D Secure needs the buyer | Send the buyer's browser to redirect_url. The result is posted to sale_callback_url, and the buyer lands on sale_return_url. The sale isn't paid yet. |
err is null, sale.status_code is 0, sale.sale_status is completed |
Paid | Confirm on your server, then fulfil the order |
err is an Error |
The payment failed or was declined | err.message is "<status_error_code>:<status_error_details>" |
Before you fulfil, confirm the payment with the sale callback on your server, or with get-transactions.
Errors
letsRock() rejects with an Error whose message is:
message |
When |
|---|---|
no-supported:google-pay-jsapi-not-available (PayMe.ERR_MESSAGES.NO_GOOGLE_PAY) |
Google's pay.js didn't load, or Google says the browser can't pay |
not-found:google-pay-button-not-found (PayMe.ERR_MESSAGES.NO_GOOGLE_PAY_BUTTON) |
No element matches payButtonSelector |
Google Pay merchant settings are missing |
PayMe returned no Google Pay settings for the sale. Check that Google Pay is enabled for the seller. |
validation:unknown-configuration-parameter, validation:invalid-type-for-cancelled-callback, validation:invalid-type-for-payment-completed-callback |
The config isn't a selector or an object, or a callback isn't a plain function |
"<status_error_code>:<status_error_details>" |
PayMe rejected the request, for example because the sale doesn't exist or can't be paid |
Payment errors arrive in paymentCompleted(err), and canceled() runs when the buyer closes the Google Pay sheet.
Step 6: Test your integration
- Create a
google-paysale in the sandbox. - Load your page with
testMode: trueand the seller's sandbox public key. - Check that the availability check passes and the Google Pay button appears.
- Pay with a card in a Google test account.
- Check that
paymentCompletedand your sale callback both report the sale. Then check the cancel flow by closing the Google Pay sheet.
| Problem | Likely cause | What to do |
|---|---|---|
| The Google Pay button doesn't appear | PayMe.isGooglePayAvailable(testMode) returned false |
Check browser and device support, and keep other payment methods available |
PayMe.create fails |
A missing or wrong public key | Use the seller's public key for the environment you set with testMode |
generate-sale fails |
A wrong request or seller setup | Check the MPL and the sale fields, and that Google Pay is enabled for the seller (error 720 when it isn't) |